How to Put Together a Useful Sketching Kit
When assembling a sketching kit, balance joy with practicality and look after your budget at the same time. Having way too many fancy art supplies will only weigh you down.
Focus on essential tools that fit your needs, consider the weight you’ll carry, and prepare for weather conditions.
And having a loose plan about what you’d like to sketch on your sketching adventure also makes decisions easier.
My journey with travel brushes, customised palettes, and budget-friendly supplies has made sketching both a creative adventure and a personal joy.
A Sketching Kit for Joy and Practicalities
When putting together a sketching kit, it’s essential to prioritise practicality and enjoyment. By considering what you truly need, how much weight you’ll carry, and the weather conditions, you can enhance your sketching experience and avoid unnecessary challenges.
3 Key Considerations for Your Sketching Kit
1. Only take the art supplies that you will use.
Constraints can be great for creativity, freeing you from overthinking what you’ll use and giving you space to focus on your sketching.
2. Think about the weight you are carrying with you, for how many hours and how far you are walking.
Tiring yourself out because you’ve packed way too much can easily end up with you feeling too tired to sketch, completely defeating the purpose of your sketching adventure.
3. Be prepared for the weather conditions.
Consider the weather conditions of your day out sketching, make sure you have sunblock, a hat, and a water bottle. I also have in my kit a compact rain poncho and a handy mosquito head net and have used both (very thankfully).
Preparing for Your Sketching Adventure
Have some ideas about what you want to sketch.
I’ve learnt that it helps to start out with at least three subject ideas.
You don’t need to do three sketches, but by having some ideas going into the limited time you have to sketch will help answer the question “what am I going to sketch?”.
Nature Journaling
So if you’re going out for a nature journaling sketch, maybe have three ideas of plants, wildlife or views that you’d like to explore.
I’m always hoping find some interesting leaves or shells because I really enjoy sketching these.
They don’t take long to draw and sketch and it is a lovely way to bring yourself into feeling like you are part of the environment. And if this is the only sketch I do then I’m happy with that too.
Urban Sketching
If you’re setting off for an urban sketch have a think about what three views of buildings, people, public transport, street views etc that you want to keep an eye out for.
If you are urban sketching and need to head inside out of the weather, the internal space of a cafe, gallery, library, information centre, or transport hub, can provide an interesting abundance of sketching options.
Slip, Slop, Slap and Weather
Check the weather before you head out.
While this is a very simple (obvious?) tip, it certainly does make a difference. Cold, windy or rainy fronts can move in quickly.
Bushwalking Sensibilities
If you’re heading out on a bushwalking’s for your nature journaling adventure make sure you take sensible the bushwalking precautions.
Let folk know where you are going, what time you’ll be back and let them know of your safe return.
Have an eperb if necessary, take extra food and water, be out with at least one other walker, have a paper map of the area (you may not have online connectivity), take an appropriate first aid kit and bad weather clothing as your basic precautions.
Join the Inspiring Mel Hills for Immersive Sketching Workshop Experiences
Be part of the immersive nature journaling and sketching on location workshop with popular watercolour teacher and wildlife artist Mel Hills.
The Launceston Art Society Inspirations Exhibition
You’re invited to the Launceston Art Society “Inspirations” exhibition, a community art exhibition showcasing the diverse talents of local members.
Join Our Community Newsletter Today
My Sketching Kit Setup
Putting together a sketching kit is a deeply personal journey, balancing practicality, experimentation, and joy.
We each end up having our own favourite art supplies and approach to sketching, so your sketching kit will be different to mine.
From travel brushes and customised palettes to reclaimed serviettes, each item in my kit reflects my evolving approach to art and creativity. It reflects my own ways of heading out for a sketch.
The Basics of My Sketching Kit
This is the basics of my sketching kit:
Brushes
1 – 3 travel brushes. These can be in various sizes and while I periodically have favourites, I can do like to experiment. My current favourites include a Rosemary dagger brush and an Escoda Round size 10, both were presents. I started very happily with cheap and cheerful water brushes from the $2 shop and I still use them.
Sketching Journal
My current sketching journal – these vary with where I’m at, whether I am trying something different out, an expensive one is on special, I’ve been given an art supply shop gift voucher (excellent present that involves many hours of joy!), or I’ve filled up a journal while on my travels and need another one but my favourites aren’t in the shop.
Pens
1-2 pens, generally a Micron 01 .04 in brown (it is just my favourite colour at the moment) and maybe a bic biro type pen in black
Pencils
1 – 2 pencils, starting with my late dad’s Stadler mechanical pencil for both sentimental reasons and no need for a pencil sharpener.
Eraser
An eraser – the one I’ve been using for years was given to my by an art class friend and it has both an eraser and sharpener and is so bright you don’t leave it behind.
I’m realising now that I don’t use the eraser very often.
This isn’t due to an unknown drawing prowess, but more because I have eased up on myself about how an initial sketch is made. I now go with what I have rather than trying to make it “perfect”.
Reclaimed Serviette
A reclaimed serviette for wiping brushes on etc. This is part of me being green.
I save barely used serviettes from cafes etc and stash them in my art bag for later use.
They are absorbent, do the job perfectly and are free. Waste not, want not.
10 Helpful Tips to Grow Your Blog Audience and Flourish Part 2
In Part 2 of our series we dive into 10 very practical tips and insights on how to grow your blog audience to flourish creatively and financially.

8 Elements Needed For Your Successful Content Plan – Part 2
In Part 2 in our series on Content Planning we go through the vital 8 elements needed to craft your own successful Content Plan.
Paints
My beloved travel pan that I’ve made up with my own combination of colours.
It was originally meant to take 12 half pans but I’ve squeezed in 24 half pans and stuck them down with blue tac.
But then I went to town with putting more dabs of colours on the mixing tray.
This means that I tend to mix colours on the page quite often and I have to confess to really enjoying that.
I’ve learnt that for me it is better to take dry paint in a travel tin rather than tubes of paint.
It is far more economical with paint as you don’t waste any precious pigment. And pans are easier to use than tubes when you’re out and about.
Water Cup
A double dipper water palette cup. It has lids and is meant to attach to the side of you palette but it can be a great way of making a mess with spills as well.
I find it easy enough to keep it separate.
Small Spray Water Bottle
A small spray bottle of water. This is used in the water dishes and for lightly spraying on the paints to reactivate them.
I keep this in two zip lock plastic bags so if it leaks it doesn’t go everywhere. It hasn’t leaked so far.
A Dry Bag for the Sketching Kit
A bag for everything to go in. I use a dry bag so if I get caught out in the rain (which has happened) everything is kept dry. This fits into my small back pack.
Alternatives for the Sketching Kit
My first sketching kit was based on what I had on hand and I only bought a few things. I was quite unsure and insecure about my sketching abilities and whether I would enjoy it or not.
I’d been going a weekly art class for a while so I already had some art supplies. I also have a very solid track record of overthinking and overfilling my bag. Now, the more I sketch, the more stripped back my sketching kit becomes.
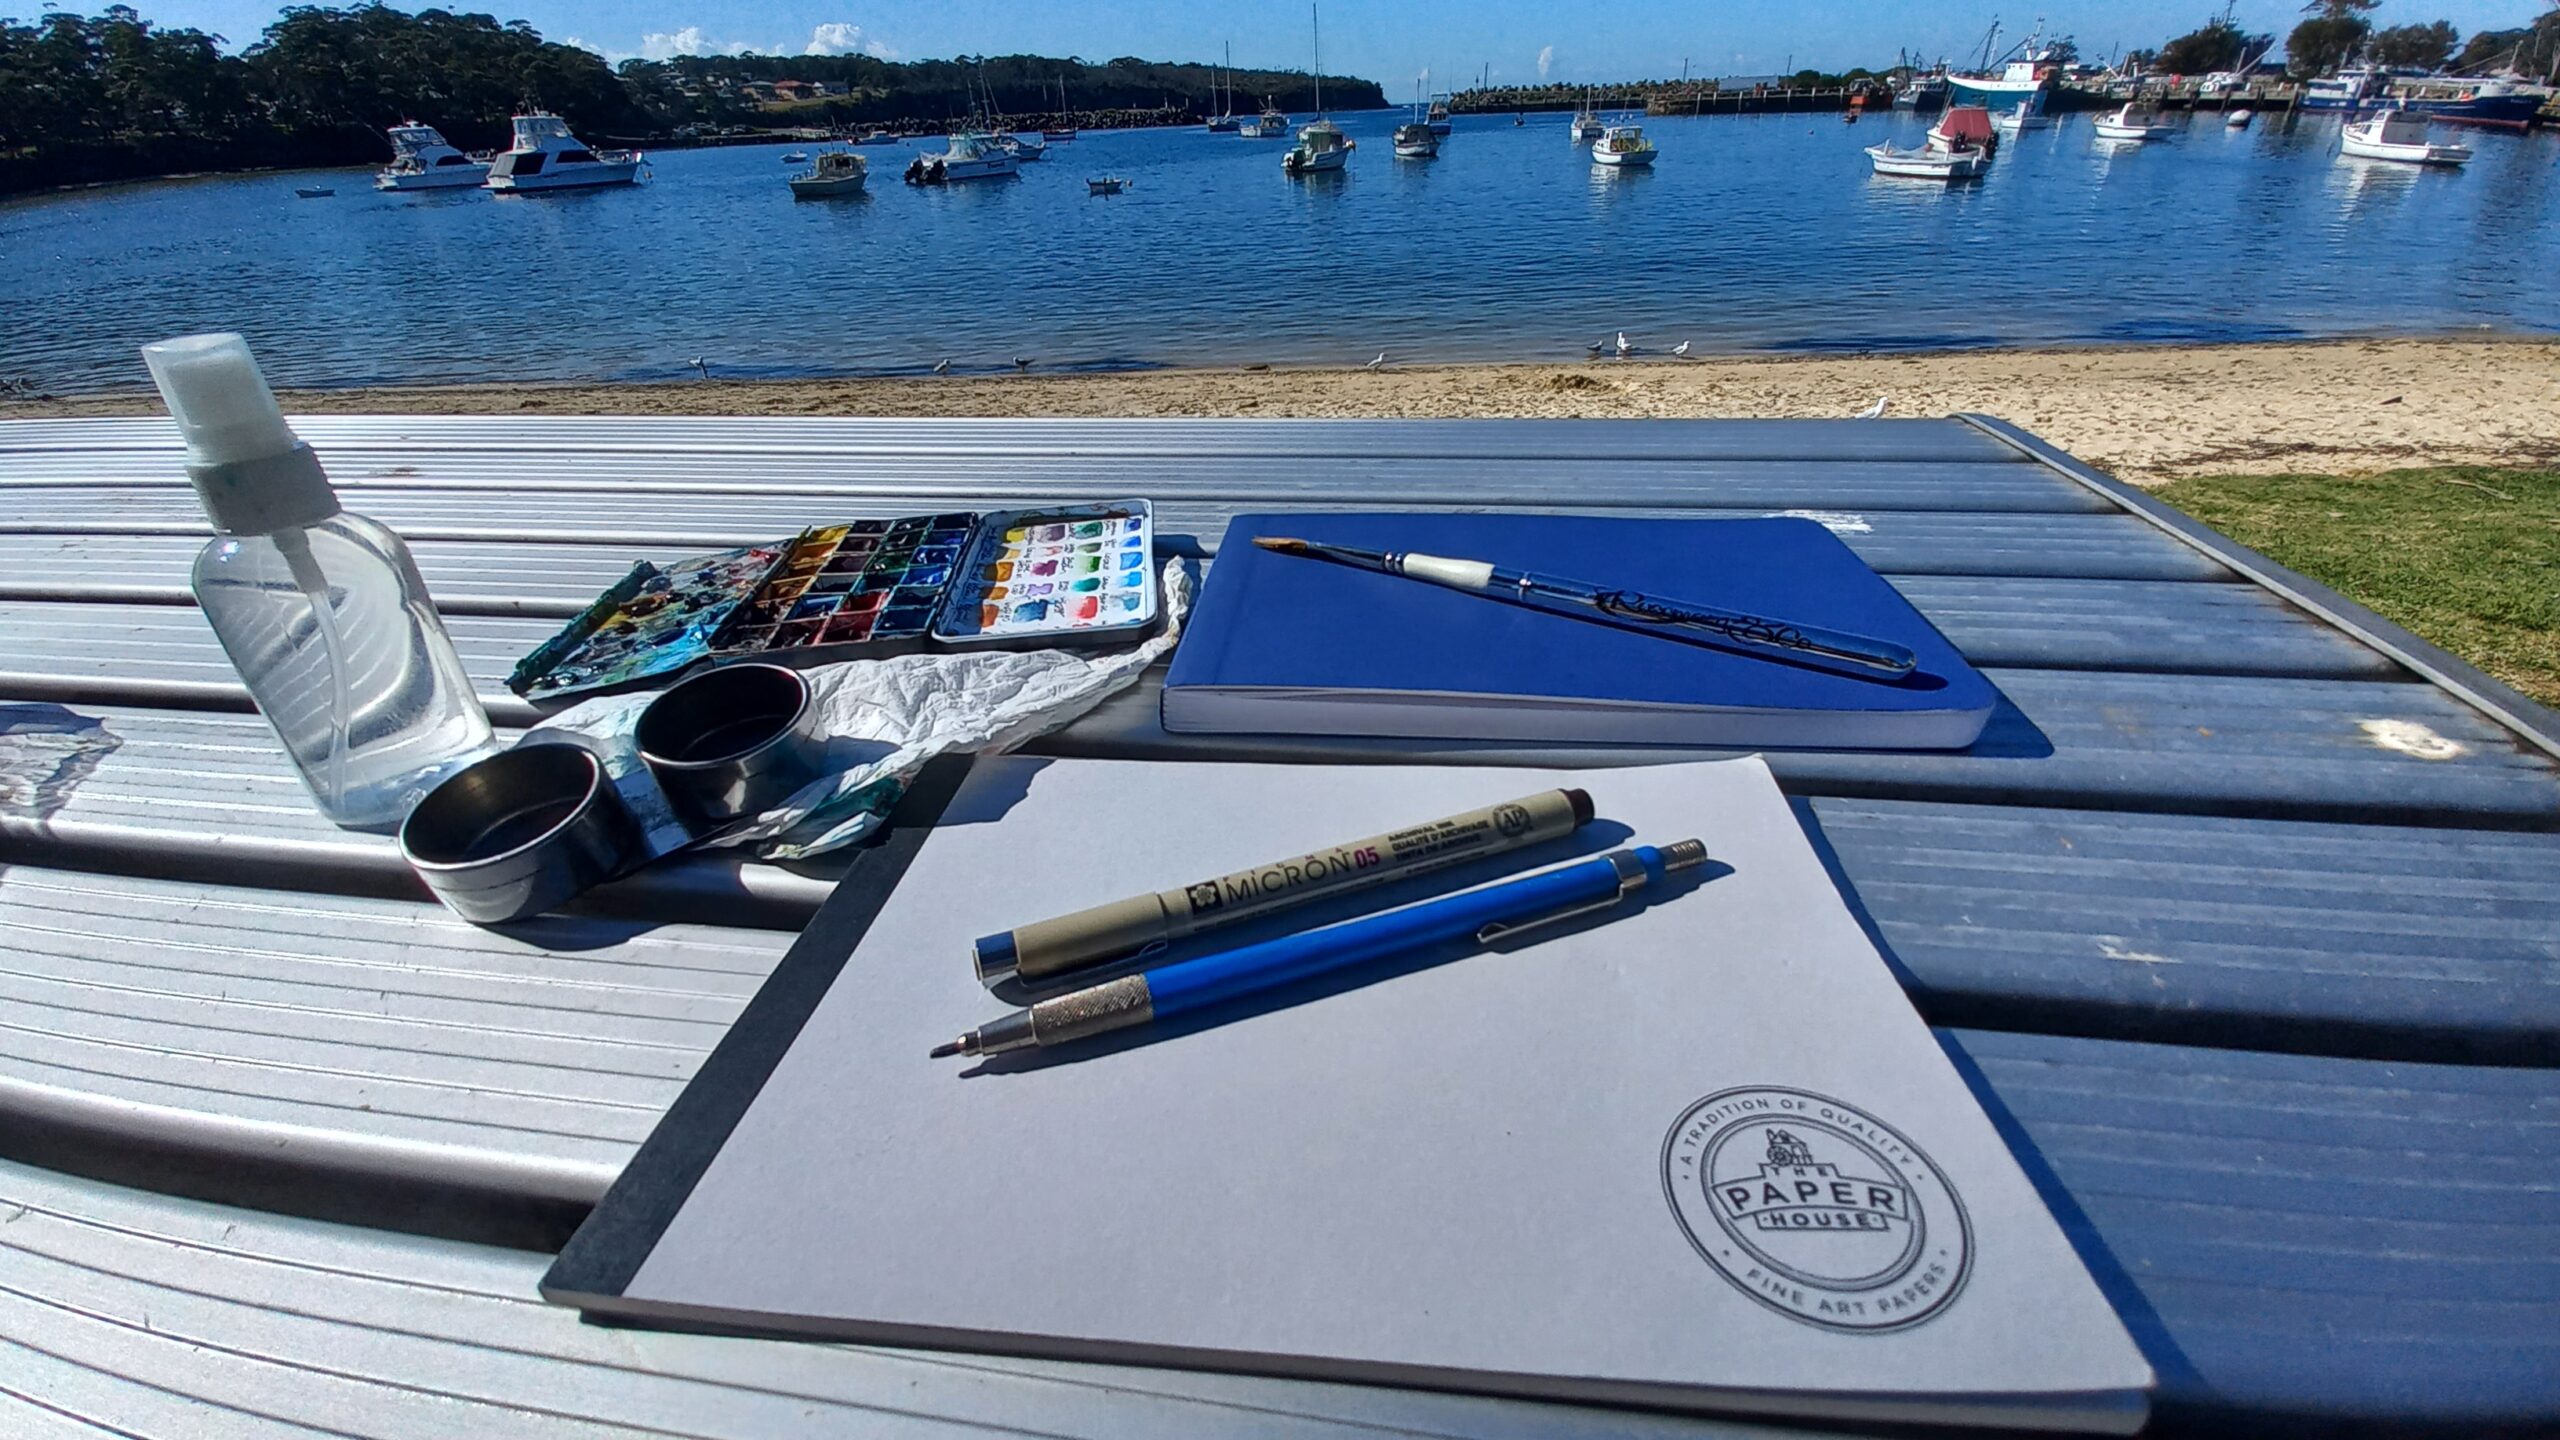
My basic sketching kit set out on a picnic table.
How a Blog Builds Your Creative Artist Profile and Income – Part 1
In part 1 in our series on how to make a blog grow your artist profile and income, we dive into what it is and how to get it working for you.

Why Every Artist and Creative Business Needs a Clear, Simple Content Plan – Part 1
In Part 1 in our series on Content Planning we explore why having a clear and simple content plan is so important for your growing creative business.
Travel Palettes Options
When I started putting my sketching kit together the options for travel palettes were quite limited.
Making up your own version does have a long history to it so I went down that route, mainly because I had the tubes of colour already so all I needed to buy was the tray and empty half pans and I did enjoy this process.
But to be frank, playing with art supplies gives me endless joy.
Now I have a growing collection of travel palettes and really enjoy playing with them.
I’ve learnt that you get what you pay for with them. So the cheap ones have cheap paint that is often more chalk than pigment – so rather awful.
My first bought travel palette was the Winsor and Newton student Cotman set of 12 pans. I waited until I found it on special before I gave it a new home. It was a great place to start and fitted my experimenting budget.
Watercolour Penciles Are A Great Option
You don’t really need to start with paints. A tin of 12 watercolour pencils from Jasart or Aldi are great value. I found the Bron products from Officeworks to be very chalky and frustrating.
I have a little sketching kit of an A4 spiral art journal and a tin of Aldi watercolour pencils next to me in the evenings so I can play with the colours and they are perfect for that.
Painting With Watercolour Penciles is Fun
With watercolour pencils, you can mix the colours, draw with them, with a brush you can take pigment off the pencil core itself and paint with that. You can also activate the pigment on the page itself (this simply means wetting it with a brush) and even make use of the shavings of the solid core of colour.
Water Brushes are Also Fun
That budget included a water brush, the ones where you fill the handle with water and screw the brush part back on.
Initially I was really daunted by this tool, now I love them. They are so simple to use and easy to carry. I switch between a round and flat one and which ever one you start with is the right one.
Mixed Media Sketchbook
As for a sketchbook, an A5 spiral bound journal for mixed media is an afford place to start.
It can take light washes, you can stick in references like a beautiful leaf, it takes in a small bag and it isn’t so precious that you’re too scared to use it.
Graphite Penciles
And with graphite pencils, you really only need to start with a B or 2B one. But if you’re using watercolour pencils, then you probably don’t need to start with a graphite pencil.
Erasers and Sharpeners
With erasers and sharpeners, I think we all have our favourites. Starting with what you have at home is ideal. The eraser and sharpener that I was given doesn’t even have a legible name on it anymore!
Finding a Connection with Sketching
When you are starting to explore an idea or new project it is so easy to think you have to have all of the gear to do well at it. But that simply isn’t the case. You need to find out if you feel any connection with the new practice.
The Challenge of Natural Talent Expectations
We all start hoping that we will find a natural talent and what we have in our mind will readily appear on the page. I’ve never known that to actually happen.
And I certainly know my own feelings of disappointment in myself for my initial attempts to barely look like my imaginings.
How to Flourish with Your Sketching Kit
But what really matters is giving it a go.
Being open to learning and growing. Experimenting and seeing where you go. When I started to paint I was so scared of not being able to paint, for some reason thinking that I could do something that I didn’t know how to do.
Once I gave myself permission to be crap and find joy with it, the whole world of painting opened up. And I was crap when I started and I loved it.
Start with a Small Budget
So starting with a budget that fits with where you are is an ideal approach.
I know for myself that there are art and craft practices that I love, but I haven’t put the hours in yet to be proficient with them on a technical level.
The joy for me is in the doing, having a play and moving towards purposeful practice to build my skills.
Revealing the Coastal Town Pop Up Jane Seychell Gallery Safe Inside a Bank
Discover the Jane Seychell Gallery in St Helens is a vibrant space for art lovers, encouraging creatives to pursue their passions and showcasing wonderful local talent in this latest Gallery Profile story with Art Trails Tasmania.
Join the Launceston Art Society’s Journey Through Education, Workshops and Exhibition
Discover the Launceston Art Society, started by a group of passionate creative women over 130 years ago and thriving today with exhibitions, workshops and friendship in their Art Society Profile with Art Trails Tasmania!
Fuel Your Creativity with 7 Inspiring Book Reviews for Artists
Discover 7 delightful books, celebrating an artist’s life, avian artistry, colour exploration, textile makes, sketchbook adventures, creativity and painting light in this inspiring book review.
7 Fascinating Books for Creative Thinkers and Artists
Explore 7 fascinating arts & crafts gems in our book reviews series from colour exploration to botanical illustration to fabric to the art business and more.
The Joy of Putting Your Sketching Kit Together
When assembling your sketching kit, remember to keep it simple and practical. Start with just the basics, and let your experience guide you in expanding your collection.
Embrace the learning process, enjoy experimenting with your tools, and most importantly, find joy in the journey of capturing the world around you through your sketches. The right sketching kit is one that brings you both creativity and comfort.
What’s Next…
I’ve been finding action lists really useful to allowing me to be on the paths that are important to me. So maybe you would too? This is about clarity and purpose rather than noisy To Do Lists!
- From here, make a list of 3 – 4 plants, pets or views around your home that you’d like to sketch. Then give it a go and be kind to yourself about it all.
- With the same interested eye, have a look around at your built environment. What are 3 or 4 views that you’d like to have a go with? What about from the backyard or the front window? Consider the inside spaces too.
- Give yourself time to sketch. It can be 10 minutes a day, on a regular walk, a special time out focused on sketching.
- Then give it a go.
The key is to be kind and gentle with yourself. Doing a little sometimes is way more beneficial that beating yourself up needlessly.
Enjoy!
Discover our Artist members…
Meet the Vibrant, Active and Friendly West Tamar Art Group
West Tamar Art Group: Making Art Amongst the Vineyard The West Tamar Art Group is a friendly and inclusive community that brings together artists, makers, and art lovers from across the stunning West Tamar region. Founded in 2013, the group was created to provide...
Bold Colours and Mark-Making with Julie McDonald
An Art Practice Centred on Sharing Connections My art practice is more than just a profession; it’s my way of sharing stories and connecting with the world around me. I thrive on experimenting with bold colours and mark-making, constantly challenging myself to step...
An Abiding Love for Colour and Making with Noelene Hammond
Mixing Colour, Brightness & Abundance My love of colour started when I began selling in art galleries. Black, white and grey do not work. I try to create a picture in my head. My boxes of coloured wool I could not be without, as they give me great joy. My...
Exhibiting Your Work in Exhibitions…
No Results Found
The page you requested could not be found. Try refining your search, or use the navigation above to locate the post.
Read What Our Members Say About Belonging
Join the growing, supportive artists community today and have your Artist story told here.
Belinda is doing a great job creating a professional looking artist hub online. Check out the profile I posted recently to see how well she does them. To all my artist friends let’s help make this THE go to place to discover local artists.
You won’t regret joining Art Trails Tasmania . It’s a welcoming community for creatives at any career stage.Becoming an Art Trails Tasmania member wasn’t a hard decision for me to make as it’s such a wealth of knowledge and support.Being member provides a quality way to showcase your creative endeavours and it’s quickly growing in reach.
We operate a home based picture framing business and recently joined Art Trails Tasmania as a means to giving us exposure to the wider artist community. We have almost immediately seen increase in activity thru our online sites, which I am certain will lead to more opportunities to grow our business.

